Valentine’s Day Clincher: Molten Chocolate Cake

February 7, 2010

Chocolate is a requisite for Valentine’s Day.  I still remember picking out chocolates in hopes of winning the heart of my third grade crush, Anya. Unfortunately for me, another boy was competing for Anya’s heart, and he shrewdly took credit for my act of love. Oh the agony! I despondently watched as he proclaimed himself her “Secret Admirer.”
While it didn’t exactly work out as planned, there’s no denying the aphrodisiacal powers of chocolate. So when you’re planning a dinner date for V-Day, dessert is a huge consideration. And while there’s no denying the romantic allure of posh dessert spots like Finale or Burdicks, they can be a little draining on the wallet.

The solution—make it yourself. It’s cheaper and far more rewarding. Spending money on a girl will make her blush, spending time on a girl will make her purr. Girls love it when you take them to a swanky restaurant, but if you slave over a good dessert, you’ll have her eating out of the palm of your hand. But guess what? You don’t even have to slave over the dessert. So for all those guys out there with ladies to impress; it’s easy to do, just follow these steps.

Step 1: Cut a hole in a box

Just kidding. I highly doubt you’ll score many ladies with that sort of gift. Here’s a better option.

First, you should invite a girl out to dinner. You can either take her to a restaurant (Sushi or Tapas are options that strike a nice balance between informal and fancy). If you’re a little more confident in your cooking skills, get some pasta from Dave’s Fresh and dine at home/dorm. If it’s a first date though, I’d keep it in neutral territory, like a restaurant.

Step 2: Prepare dessert yourself. A mediocre meal can be remedied with a phenomenal dessert. This final course is the clincher, which is why you should make it yourself. She’ll appreciate the fact that you made it yourself, and best of all—it’s a guaranteed way to get her back to your place.

You should make either the chocolate soufflé or the molten chocolate cake. Both desserts are flashy enough to wow her and easy enough to keep your pre-date day stress free. And best of all, these desserts can both be made ahead of time. Just make them right before you go and place them refrigerator. When you get back, put them in the oven and bake them and voila! Hot, freshly baked dessert! The last thing you want to be doing when you bring her home is fretting over the dessert in the kitchen. By prepping everything beforehand, all you have to do when you get back is put it in the oven. What you decided to do after dessert is all up to you.

If you wanna make the Soufflé…
I detailed this one in the soufflé post, so just click here for that recipe

If you wanna make the molten chocolate cake…

Molten Chocolate Cake
(adapted from New York Times recipe, which in turn was taken from “Cooking at Home with a Four-Star Chef” by Mark Bittman and Jean-Georges Vongerichten)

INGREDIENTS
1 stick (½ cup) unsalted butter, plus more to butter the molds
4 ounces bittersweet chocolate
2 eggs
2 egg yolks
¼ cup sugar
2 teaspoons flour, plus more for dusting

METHOD

1. Beat together the eggs, yolks, and sugar with a whisk or electric beater until light and thick.

2.) In a double boiler (Saucepan of simmering water with a bowl on top), melt chocolate and butter together until the chocolate is almost completely melted.

2. Pour in the egg mixture, then quickly beat in the flour, just until combined.

3. Butter and lightly flour 2 8-ounce molds, custard cups, or ramekins. Tap out the excess flour, then butter and flour them again. Divide the batter among the molds.

(At this point you can refrigerate the desserts until you are ready to eat, for up to several hours; however, you must bring them back to room temperature before baking.)

4. Preheat the oven to 450 degrees. Bake the molds on a tray for about 11 minutes; the center will still be quite soft, but the sides should be set.

5. Once baked, take ramekins out of oven. Immediately place a serving plate on top  of the ramekin. Acting quickly, flip ramekin/plate over. The cake should unmold itself onto the plate. Serve immediately.

Ps: It’s good with vanilla ice cream and a couple of sliced strawberries.


Growing In College

December 4, 2009

Since early September, I’ve been growing right here in my dormitory. I know it’s risky. I know I could’ve just bought whatever I needed. But I just had to do it. There’s nothing more satisfying. I decided against Hydroponics, instead choosing the simple pot and soil technique. And just so we’re all on the same page, I’m talking about my Basil plant. If you got here through some google search, well… sorry to disappoint.

I picked up Count Chocula (yes, that’s his name) at Shaw’s my first week at school. He’s very fragile and he has to be watered every other day. This past weekend he accompanied me on my Thanksgiving trip to Cape Cod, since no one was going to be here at Tufts to water and sing to him. Having never taken on the responsibility of a child or a pet dog, I’ve taken the Count’s life quite seriously. I’ve trimmed him twice, once because he got a little unwieldy, and once because I needed something to improve an improvised scallops dish (really easy—sauté some scallops in a little oil with cumin, kosher salt, pepper, and then a splash of half and half and the basil).

Unfortunately, I think it’s time to sacrifice the Count to the culinary gods. My goal is to make some delicious pesto this (or possibly next) weekend. I’ve got the pine-nuts; all I need is some parmesan cheese and a solid recipe. I’ll keep you all posted.


Julia Child Costume

November 3, 2009

Halloween costumes can be pretty funny, but often they are woefully predictable. Most girls spend Halloween coming up with ways to dress like a playboy centerfold. Their outfits leave little to the imagination and put plenty of emphasis on their… assets. On the other side, guys try to draw attention to their manliness, often wearing costumes that show off their musculature.

I decided to go against the grain and be none other than Julia Child. It proved to be a truly winning costume–I nabbed the grand prize (a wii!) at AEPi’s costume contest. Like any good recipe, the costume required some key ingredients, a couple of tools, and some serious diligence.

Julia Child

Julia Child Costume
Yield: About 1 costume

Ingredients

*1 conservative skirt (Yes, it’s Halloween, but Mdme. Child was no slut)

*A long sleeve polo with wide-spread collar (conversely, you could get a dress if nothing seems to work)

*1 Apron (you’re gonna need to put your cell phone somewhere)

*1 Lipstick (I used covergirl’s Pink Chic, but to each his/her own)

*1 set of heels (You’re gonna need that height to pull off her 6’2 figure)

*1 wig (short, brown, curly)

*Pearl earrings and a pearl necklace necklace (I found clip-ons)

*A turkey baster or some other easily identifiable cooking tool

*That distinct voice (deep yet femininely sing-songy)

*A circular “L’Ecole des Trois Gourmandes” badge/pin

I also made one batch of those pumpkin cookies I wrote about last time and brought them with me. No, it wasn’t boeuf bourguignon, but that’s not quite as appealing to inebriated frat brothers and coeds. At first people were hesitant to take a cookie, especially when they heard that I had actually baked them. Nobody seemed to trust my baking abilities! Well, once word got around that I had actually made pretty decent, roofie-less cookies, they were snatched up mighty quick.

Yes, half the people thought I was Mrs. Doubtfire and a handful were certain I has dressed up as Mrs. Featherbottom, but those that got it seemed to like it.


Pumpkin White Chocolate Chip Cookies

October 31, 2009

Cookie

White Chocolate is pretty lame. If Chocolate were Vincent Chase, then white chocolate would be Johnny Drama. For those of you who don’t watch Entourage, I’ll make another comparison. If the Beatles were made of chocolate, then Ringo would be white chocolate. For the sake of completion, let’s say that John is unsweetened, George; semisweet, and Paul; milk chocolate.

White Chocolate

Let me put the pop culture references aside and examine the bastard child of the cacoa bean on a more basic level. Lacking any cocoa solids, white chocolate instead consists of sugar and cocoa butter—the fatty excess of the cocoa bean. You know how they say Dutch-process on some cocoa? Well, the “processing of cocoa” is essentially the removal of cocoa butter from the cocoa bean. The higher the concentration of cocoa solids, the more bitter the chocolate. Unsweetened baking chocolate is simply 100% cocoa solids. You should keep in mind that half of what you see in stores isn’t even true white chocolate. Look at the labels—Nestlé sells White Morsels, which lack the subtly chocolate flavor imparted by the cocoa butter. These chips are simply sugar and partially hydrogenated oils, no cocoa butter. These cheap imitations tarnish white chocolate’s already-low reputation.
So I’m not a big fan of white chocolate. But I realize that there are times when it can be put to some good use. This pumpkin cookie recipe is one of those times for white chocolate to shine.

Pumpkin

Much like bananas, pumpkin helps create a moist baked good. While there are plenty of spices that go with pumpkin–from nutmeg to ginger to allspice—this recipe boldly chooses to go with cardamom, which creates a more unique and full-bodied cookie. Oh, and who can forget the ever-dependable cinnamon! Cinnamon is one of those spices that goes well in virtually every autumnal dish.

A very fluffy dough
The texture and flavor of these cookies make it one of my favorites. And it’s best with white chocolate. It complements the pumpkin and spices so well. Chocolate chips would overpower those subtler flavors, making this recipe one of those few times I’ll pick up whiteys. So without further ado…

Plated cookies

Pumpkin White Chocolate Chip Cookies (AKA The Pumpkin Blumpkin)
Makes around 36 2.5-inch cookies

Ingredients
2 cup regular flour
2 teaspoon ground cinnamon
1 teaspoon ground cardamom
1 teaspoon baking soda
2 sticks of salted butter, softened
½ cup granulated sugar
½ brown sugar, packed
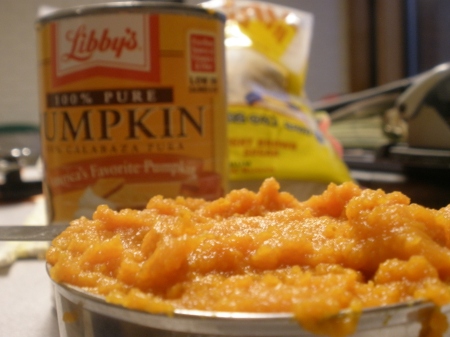
1 cup of cooked pureed pumpkin, canned (unadulterated)
1 egg
2 teaspoons vanilla extract
12 oz white chocolate chips
2/3 cup of chopped walnuts (OPTIONAL)

1.) Preheat oven to 350ºF.

2.) Combine flour, spices, and baking soda in medium bowl.

3.) In larger bowl, whip softened butter and both sugars until creamy

4.)Whip in pumpkin, egg, and vanilla extract until well mixed

5.) Gradually beat dry ingredients into the larger bowl

6.) Stir in nuts and chips

7.) Place golf-ball sized globs of dough on ungreased cookie sheet. Flatten them slightly, as the dough won’t spread all too much on its own.

8.) Bake for 11-14 minutes, until sides are golden brown and center is soft. Let cool for two minutes before removing from cookie sheet.


How to separate and whip egg whites

September 3, 2009

HOW TO SEPARATE AND WHIP EGG WHITES

Whip It Good

This instructional post grew out of the chocolate soufflé post that I just put up. Whipping whites is a vital baking technique that must be learned. Hopefully this entry will be somewhat enlightening and remotely helpful.

Whipping egg whites is an easy-to-learn technique; however, the process requires a certain level of awareness during prep. This how-to explains how to separate the whites from the yolk and how to achieve the whites’ maximum height. And best of all, you don’t need one of those copper pots to get the job done!

The white, also known as the albumen is virtually all protein and no fat. It’s important that you keep the whites totally fat free. Any grease will impede their ability to inflate. So wash your beaters well, and clean the bowl. I do so by moistening a paper towel in white vinegar and wiping down the sides of the bowl. The bowl should be dry, as any water will inhibit the growth of the whites. It is important that you use a relatively small bowl for the whipping, since you want all of the whites in motion at all times. A really wide bowl isn’t the best option here.

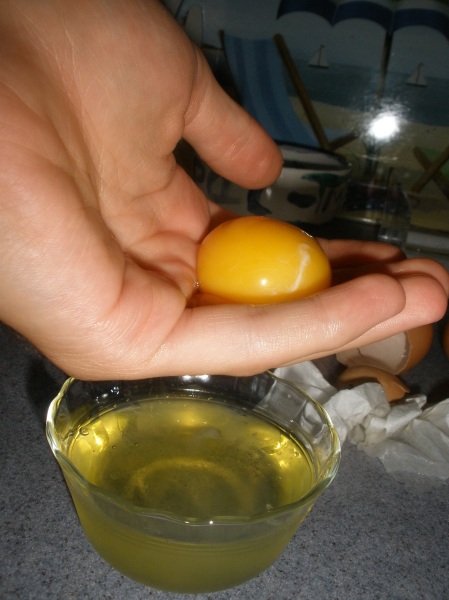
Separating the eggs can be done several different ways, all of them equally effective. The first way is to crack the egg in one hand and break it open over your other hand. The fingers in the hand not holding the egg shell should be about quarter inch apart. This process allows the whites to slip through your fingers; it leaves the yolk right in your slightly cupped hand. This is a very good method if you’re good at opening eggs with one hand; however, a bad break could lead to a busted yolk. And the slightest bit of yolk will sabotage your efforts.

Good if you can open eggs with one hand

Option #1: Good if you can open eggs with one hand

Don’t fret if you can’t break an egg open with one hand. There’s another perfectly acceptable way to segregate the whites from the yellow. Crack an egg shell in the middle and hold the broken egg over a bowl. Pouring the contents of the egg from one half-shell to the other causes the white to slip out into the bowl beneath. Just keep alternating the yolk until the eggs whites are totally separate.

The third way and final way to divorce the yolk from the albumen is to use an egg separator. This little gadget can probably be purchased at any kitchen store. It’s certainly fast, clean, and effective—but it’s not perfect. I’ve used it several times and I had a yolk break on me once and ruin the whites I had already separated.

Option #3 A nice accessory, but by no means a necessity

Option #3 A nice accessory, but by no means a necessity

The egg whites should ideally be at room temperature for optimal loft. The whites, as previously stated, are a protein, and they expand more easily when warm. Take them out of the refridge a half-hour before use if you can.Getting there

To whip, begin by using the lowest setting so as to combine the eggs. Once your whites have come together (should only be five seconds), crank up that mixer to the highest setting and let ‘er rip. If necessary, move your mixer in a circle in the bowl to keep all those whites in motion.

Stiff Peaks, glossiness provided by granulated sugar

Stiff Peaks, glossiness provided by granulated sugar

Adding an acid to the whites stabilizes them, allowing them to maintain the air whipped inside of them. Most recipes have you throw in cream of tartar, which has never failed me. If you don’t have this, try a small amount of white vinegar. The acid should be added once you bump the mixer peed up from low to high. A pinch of salt is generally recommended to whites as well.

Please call your doctor if your stiff peak lasts more than four hours

Please call your doctor if your stiff peak lasts more than four hours

Soft Peaks are achieved first, and then stiff peaks. The easiest way to check the doneness of your whites is by stopping your mixer and lifting it vertically out of your bowl. If the peak in the bowl flops over when it detaches from the whites of the mixer, then you’ve got soft peaks. For the stiffer variety, continue mixing until the peak stands on end when the mixer is pulled up. Stiff peaks are a little tougher to get in comparison to their flaccid counterparts. If you overbeat egg whites, they can become watery and go from stiff to soft. If this happens, you can add an egg white to the bowl and whip up the entire mixture again. Much like poaching an egg, this is something that takes a little practice but is totally doable. Just make sure to keep the whites grease free–that’s 90%  of the battle!

Stiff Peaks will stay up when you turn the mixer upside-down.

Stiff Peaks will stay up when you turn the mixer upside-down.


Planifolia vs. Tahitian — A VANILLA BEAN SMACKDOWN

August 18, 2009

Vaccuum TightiesI am horrible at making decisions. When I got my acceptance letters from college, I spent the month flip-flopping between schools (Hopkins, WashU, and Tufts) before sending in my enrollment to Tufts the day of the deadline. I’m always the last one to order at dinner and the first one to second-guess myself.  So when the local culinary store offered me two kinds of vanilla beans, you can imagine my predicament.

Let me jump back a little bit. Earlier this summer, I did some work over at Lamberts Cove Inn restaurant. I worked under the Sous chef, Max, who taught me how to make the various desserts and appetizers. It was there while making the Chocolate Espresso Pot de Crème that I had my first experience with vanilla beans. Max taught me how removed the seeds from the bean (cut lengthwise and scrape the knife down to collect) and store the hulled beans (in sugar to get vanilla sugar). I didn’t know how or where to get the beans, but I knew that I needed to stock up!
Last Tuesday, my mom was in line for movie tickets (Julie and Julia) and I was browsing the local gourmet store, Le Roux. I examined all the gadgets. These kinds of stores can be dangerous. They sell tools that you never knew existed, but the moment you see them you feel as though you could not possibly cook without them. As I sauntered through the aisles, I was hit by that incredible and distinct aroma. Could it be? Did my nose deceive me?  There in front of me stood packages of vacuum sealed vanilla beans. A quarter of a pound for $14.99! And this is Massachusetts, which means no sales tax on food!

But then I noticed the two big labels—Planifolia and Tahitian—demarcating the different varieties. This is when the trouble started. An employee appeared at my side (I suspect apparition) and asked if she could help. I’m sure it was an odd sight—a bearded fellow examining the seemingly identical packages, sniffing them intently. I asked her if she could explain the difference between the two, as the labels failed to do so. She escorted me to the front where she did some “quick research” (google search), which told her that the Tahitian beans were the sweeter variety. When I paused, waiting for more info, I was met with a vacant stare and silence. How tremendously illuminating! Since I was short on time, I simply purchased the Tahitian beans and secured the receipt tightly in my pocket. Off to the movies!

Throughout the film, my mind kept doing loop-de-loos over these damn beans. As soon as I got home, I did some researching of my own. The lack of information on the company’s own website was rather frustrating, but a couple hours later, I had gathered some basic info on the beans, thanks to a couple of sites…

Basic Vanilla Bean Facts

Where do vanilla beans come from?

-The beans come from orchids, which originated in Mexico but have since made it to other regions (more on that later). The orchids are supposedly quite valuable, and according to Penzey Spices, the farmers who cultivate vanilla keep very loud and intimidating dogs so as to protect the beans from thieves.

How long should a vanilla bean be?

I’ve always thought that size wasn’t a big issue, it’s how you use it… But the proper length for a vanilla bean is seven or so inches. Any smaller and the flavor won’t be as good. The longer the bean, the more robust the flavor.

What are the different kinds of vanilla beans?

There are two species of vanilla beans. The first is Vanilla Planifolia, which originated in Mexico. Since then, the orchid has been cultivated in other parts of the world, most famously in Madagascar, where it might be referred to as “Bourbon” vanilla. This name comes from the island where it was grown (you guessed it—Bourbon Island, athough it is now known as Reunion Island). Madagascar gets a lot of the attention for vanilla because as of 2006, 59% of all vanilla is cultivated there.

Despite being the land of their origin, Mexico produces only 3% of all vanilla worldwide. The flavor of these Planifolia beans is relatively similar to those of Madagascar. The difference is that they have a slightly darker, woodier fragrance.

Then there are Tahitian beans, which come from an entirely different plant—Vanilla Tahitiensis. This plant is a mutation of the planifolia. The beans contain very little vanillin content (the compound that contributes most the the flavor we associate with vanilla), instead giving off a floral, fruity fragrance. So while it may not give off the traditional “vanilla scent,” it is reportedly popular with pastry chefs due to its alternative aromas. Physically speaking, it is slightly shorter, plumper, and moister than the planifolia bean. The bean contains fewer seeds than the Planifolia, but the bean itself gives off a stronger scent. One site claimed that these beans are far more uncommon and thus more expensive. But I’m investing in vanilla beans, not Pokémon cards—I don’t care about rarity. Besides, they were the same price at the store.

So let’s sum that up real quick:
Vanilla Planifolia: The O.G. bean, two different subsets
-Madagascan/Bourbon Vanilla: Bold, traditional flavor
-Mexican Vanilla: A little woodier, but pretty similar
Vanilla Tahitiensis: The X-Men Bean, floral/fruity scent

All of the websites I visited recommended the reader try out each kind and find the one they like best. Granted, these websites also were vanilla vendors, so of course they wanted you to try out each one! If you buy all the different kinds, they make more money! Penzey Spice recommended Madagascar beans for all around use, while they claimed that the Mexican beans’ darker flavor “is perfect for vanilla liqueur and coffee drinks.” They had nothing about Tahitian beans. Grr…

The company I purchased them from–Saffron, Vanilla Imports—provided no information on their website about Tahitian beans. It isn’t even specified where the Planifolia beans are from. Are they Mexican or Madagascan? The “Vanilla’s History” page on the site only speaks about Mexico. Should I assume then that they’re Mexican?

Ughhhh… I’m having second thoughts just writing all this down. Seriously, I am gonna go crazy over this. I have yet to open the package, so if any you readers have an opinion one way or the other, feel free to comment.

When I went back to the store, I explained to the lady at the register that I wanted to exchange my Tahitian beans for the Planifolia ones. She giggled and cocked her head slightly, then innocently asked, “Well there can’t be much of a difference, can there?”