There Will Be Blood (Oranges)

March 2, 2010

The other day, I was strolling through the cafeteria when something in the “produce section” caught my eye. The cafeteria’s fruit options are normally pretty mundane (bananas, pears, apples), but I had just spotted some maroon-hued spheres nestled amongst the pedestrian oranges.
Did my eyes deceive me? Were there actually blood oranges? Like a nineteenth-century Californian prospecting for gold, I sifted through the fruit pile, and ended up with a trove of citrusy treasure. I snatched one or two (or seven) blood oranges, hid them in my backpack, and absconded from the cafeteria. All without raising the suspicions of the eagle-eyed lunch ladies.


As I walked back to my room, I mulled over my culinary options. Should I make a blood orange sorbet? Or maybe some marmelade? In the end, I decided on a tart—a perfect Valentine’s treat. The recipe (courtesy of Food and Wine via Smitten Kitchen) seemed relatively easy.

A wine bottle = makeshift rolling pin

If I make this again, I’ll be buying one of those Pillsbury pie crusts, because the dough took way longer than I thought. Due to my shoddy knife skills and the absence of a countertop, the peeling/cutting of the oranges was frustratingly messy and time-consuming. Once the genocide of the blood oranges finished, I meticulously assembled the tart by artfully arranging the sections on the pastry. All that was left was to let it freeze overnight. Unfortunately, the tart didn’t fit in my freezer, so I decided to put it in the dorm’s communal freezer. No big deal, right? After all, what’s the worst that can happen?

Then things got ugly. I checked on the tart after about thirty minutes, only to find the aluminum foil covering balled up on the ground outside of the fridge. Upon opening the fridge door, I was greeted with the mutilated remains of my Blood Tart. Someone with a bad case of the drunchies (drunk munchies) had obviously checked the fridge for goodies and found my uncooked tart. I was angry that I had put three hours into putting this tart together, only to have some drunken douchebag tear it apart in the course of thirty minutes.

I suppose it was karma. For all I know, this guy (or girl) had seen me steal the oranges from the cafeteria and was angered by my epicurean injustices. Gastronomical vigilantism is rare, but not unheard of.

Luckily, there was enough dough and fruit left behind for me to reassemble it. I shoved the citrusy innards back inside of the tart and patched up the gaping holes with some newly made dough. By the end of the evening, I had a passable Franken-tart.

While it wasn’t the prettiest looking dessert, it was damn delicious. After cooking the tart, I drizzled some homemade caramel on top, which also helped conceal the tart’s reconstructive surgery scars.  Everyone said it was tasty; the caramel was probably the best part.

So collegiate cooking lesson for the day: Don’t trust the people you live with, particularly when it comes to delicious food.  And never put something of value in the communal kitchen.

Flaky Blood Orange Tart
Adapted from Zoe Nathan, via Food and Wine

This crust was delicious, but if you’re pressed for time (or just lazy) then buy a Pillsbury pie crust. They are cheap, fast, and versatile.

Crust
1 cup all-purpose flour, plus more for dusting
1/4 cup plus 2 tablespoons granulated sugar
1/4 teaspoon baking powder
1/4 teaspoon salt
1 stick plus 1 tablespoon unsalted butter, the stick cut into 1/2-inch pieces and chilled
3 tablespoons ice water
8 to 10 blood oranges (about 5 ounces each) [I only needed 7]
1 large egg yolk mixed with 2 tablespoons of water

Preparing the dough
In a food processor, pulse the 1 cup of flour with 2 tablespoons of the sugar and the baking powder and salt. Add the stick of cold butter and pulse several times, just until it is the size of peas. Sprinkle the dough with the ice water and pulse just until moistened crumbs form. Turn the crumbs out onto a work surface, knead once or twice and pat the pastry into a disk. Wrap the pastry in plastic and chill for 30 minutes.

On a floured work surface, roll out the pastry to an 11-inch round, about 1/4 inch thick. Transfer the pastry to a parchment paper–lined flat cookie sheet and refrigerate for 15 minutes, or until chilled.

Preparing the fruit
Peel the blood oranges, removing all of the bitter white pith. Thinly slice 2 of the oranges crosswise; remove the pits. Transfer the orange slices to a plate. Working over a sieve set over a bowl, cut in between the membranes of the remaining oranges, releasing the sections into the sieve. If you (like me) lack a sieve, a gentle squeeze with your hand will suffice. Remove the pits and gently shake out as much juice as possible without mashing the sections; you will need 1 cup of sections. Reserve the orange juice for another use.

Assembling the tart
Arrange the orange sections on the pastry, leaving a 2-inch border all around. Sprinkle 2 tablespoons of the sugar over the oranges. Using a paring knife, thinly slice the remaining 1 tablespoon of butter over the oranges. Fold up the pastry over the oranges, leaving most of the oranges uncovered. Brush the pastry with the egg wash and sprinkle lightly with 1 tablespoon of the sugar. Arrange the orange slices on top, leaving a 1-inch border of pastry all around. Sprinkle the remaining 1 tablespoon of sugar on top. Freeze the tart until solid, at least 4 hours or preferably overnight. This allows it to firm and and hold its shape in the oven.

Baking the tart
Preheat the oven to 375° and position a rack in the center. Bake the tart directly from the freezer for 1 hour and 15 minutes, until the fruit is bubbling and the pastry is is a golden brown. Let the tart cool for at least 30 minutes before serving it. When ready to serve, pour Caramel sauce on top.

Deep, Dark Salted Butter Caramel Sauce

Makes about 1 1/3 cups of dessert sauce

1 cup sugar
3 ounces (6 tablespoons) salted butter,

1/2 cup plus two tablespoons heavy cream, at room temperature

Melt the sugar over medium high heat in a large pot (at least two or three quarts) whisking or stirring the sugar as it melts to ensure it heats evenly. If the sugar begins to clump, then you’ve been over-stirring. Should this happen, let it sit for about twenty seconds, before you continue to stir. Cook the liquefied sugar to a nice, dark copper color. Add the butter all at once and stir it in. Once you turn off the heat, pour in the heavy cream (The sauce will foam up quite a bit when you add it; which is why you want the larger pot), whisking it until you get a smooth sauce. If any pieces of hardened sugar remain, they can be strained/picked out.

You use it right away or pour it into a jar and store it in the fridge for up to two weeks. When you take it out, it will likely have thickened a bit but 30 seconds in the microwave brings it right back to pouring consistency.


Just Peachy

August 30, 2009

GRILLED PEACHES
Grilled Peaches
Grilling is one of those quintessential summer activities here in the USA. So are things like lawn-mowing, going to waterparks, and watching mind-numbing action flicks. But this is a food blog, so let’s stick to the grilling.

I just learned how to operate the grill this summer. When I’m not singeing off my eyebrows igniting the damn thing, I really enjoy cooking on it. While many associate grills with meat (or Lil’ John and T-Pain, but that’s a totally different story), there are plenty of other things that can be grilled. Grilling veggies, in my opinion, is an infinitely better method than steaming. The vegetable slices gain that recognizably robust flavor that we associate with grilling. I’ve grilled eggplant, squash, red pepper, portabello mushrooms, zucchini and others. Hell, I don’t even like squash and I ate that like nobody’s business.

Last year around this time, I read an article in GQ about grilling. Normally I’d be wary of recipes from a magazine that plugs designer jeans with price tags that rival the GDP of some third world countries, but the close-up photo of the juicy peach with those grill lines looked so amazing that it was love at first sight.

Fast-forward one year. My grilling addiction is in full swing, and I stumble across that old GQ issue. Suddenly I’m reminded of the peaches, so I immediately schlep over to the grocery store in search of some perfect fuzzy-wuzzies. After washing them and padding them dry, I halved the peaches.
Freestone Peaches
The recipe calls for a brown sugar glaze, which I sort of winged. In a saucepan, I heated three tablespoons of butter and 2 tablespoons of brown sugar until it began to boil. I then threw in a dash of cinnamon, a little salt, and a few drops of vanilla extract.

The grilling was pretty easy. I heated up the grill to high-medium and painted both sides of the peaches with the brown sugar/butter glaze. They went in flesh-side down; after three minutes, I flipped them onto their skins for another three. You do not want these babies to char or get mushy. When a fork pierces the flesh easily (like a baked potato), you’ll know it’s done.

I served the halves immediately, and spread the remaining brown sugar syrup on the peaches with a little ice cream. It was truly heavenly.

Grillz

Recipe

Grilled Peaches (serves 4 if you give each person a half, I served an entire peach to two people)

Adapted from GQ June 2008

Ingredients

Two Peaches, washed, padded dry, and cut in half (keep skin on)
3 tablespoons butter (salted preferably, but unsalted is fine—just add a pinch of salt)
1½ tablespoons of brown sugar (light or dark, whichever)
Pinch of ground cinnamon, add more if necessary
A few drops of vanilla extract, to taste

Heat grill to medium, and oil the rack in order to keep peaches from sticking (and also to achieve those awesome grill lines)
Heat butter and brown sugar in saucepan and after butter begins to brown, take off heat and add cinnamon and vanilla. Brush both sides of the peaches with this mixture. Place peaches flesh-side down on grill and cook for three minutes, then flip to other side.

NOTE: Using those metal tongs makes this a whole lot easier.


Upside Down Cake

August 26, 2009

Cake

When you go to the grocery store, you should never, I repeat NEVER, buy fruit unless you know exactly what you’re going to do with them. If you plan on eating fruit raw, it’s better to err on the side of caution, purchasing the bare minimum. For instance, my mom purchased some pears on a whim. Bad decision. They sat untouched in the fruit bowl for three or four days, before being evicted to the fruit compartment of the refrigerator to retard the ripening process.

I felt guilty neglecting these perfectly acceptable Bartlett pears, but the honest-to-blog truth of it is that I’m just not really a pear guy. I suppose it’s a decent enough fruit, but I’d much rather be biting into a crisp apple (ideally schmeered with a little bit of peanut butter or honey). Granted, my mom never really buys anything other than the basic Bartlett. Word on the street is that some of the other varieties, such as Bosc and Comice, are more flavorful.

Anyhoo, I had three ripening pears, and no real desire to eat them. So I decided I would use them in one of the world’s most adaptable fruit desserts—Upside down Cake! This cake is one of the best ways to use up fruit. While I personally enjoy it best with blueberries (in all honesty—I hadn’t made the cake with anything else until this point), I was ready to give the pears a shot.

This upside down cake is a pretty easy recipe, creating a wonderfully fluffy cake. I enjoy serving it with a nice Crème Anglaise or ice cream, but it could easily stand on its own. A lot of cakes (or at least their frostings) are far too sugary, but this one could easily be served at a breakfast or brunch.

Paint This, Cezzane!

Paint This, Cezzane!

Since I was dealing with pears, I decided to alter the recipe just a hair. Instead of granulated sugar, I coated the pears with brown sugar (light or dark) and a sprinkle of cinnamon (maybe a quarter teaspoon). This little change helped boost the fruit in the flavor department. In the end, the cake turned out alright. The pears were good, but next time I’ll probably try sautéing the pear slices to intensify their flavor. But on the whole, I’d say that these pears went down with some real style.

Cake
RECIPE FOR UPSIDE DOWN CAKE (serves eight)
Ingredients
1 Cup of granulated sugar
½ cup of butter
2 eggs
½ lemon zest
½ teaspoon vanilla extract
2 cups of flour
1 tablespoon of baking powder
Salt to taste
1 cup of Milk (2% used)
Fruit of your choice (if larger fruit, cut into small slices)

Making the Cake

-Cream butter and sugar together until light and fluffy (5 minutes)"You spin me right round"
-Add zest, vanilla, and eggs. Mix for approx. 5 minutes

-Mix dry ingredients in a separate bowl until blended, then add them to the batter, alternating with the cup of milk (finishing with flour mixture)

Putting it together
-Preheat oven to 350
-Melt down ½ stick of butter to liquid and place it in a 9-inch pan, using your finger to spread it over the bottom and the along the sides
-densely pack bottom with fruit of your choice, then drizzle sugar on top of the layer of fruit
-Fill pan with batter
-Sprinkle top of cake with granulated sugar and the smallest pinch of lemon zest
-Bake in oven until the toothpick comes out clean (approximately 35 minutes)


Kumquats Revisited

August 18, 2009

OM-NOM-NOM

Yumsies

Yes, I’m sure you’re sick and tired of hearing about Kumquats. But I have some great news that I’m just dying to share! So I was thinking of ways to use up that delicious kumquat-flavored simple syrup from the candying process. I had a cup and a half of the stuff, and no idea of how to use it up. Then, as I was eating some of the leftover Olive Oil Ice Cream, it came to me. Kumquat sorbet! But it gets better! I had some of the kumquat infused vodka leftover! Perfect—kumquat  vodka sorbet.

I didn’t really have a recipe, but a quick glance at a couple of sorbet recipes gave me a nice base to work off of.

Unsurprisingly, all the recipes I came across required juice of the choice fruit. While I did have kumquat flavored components, there was no doubt that I needed to somehow get “kumquat juice.” The fact that people somehow manage to extract juice from blueberries and pomegranates for all those absurdly expensive health drinks gave me hope. I decided to throw a bunch of ‘quats with a little water in a food processor, strain the mixture, and hope for the best. Lo and behold, it worked! I should’ve used a few more kumquats, but in the end the flavor worked out alright.

"Drainage! Drainage, Eli you boy, Drainage!"The vodka serves two purposes. First is flavor, and the second is consistency. The alcohol in Vodka keeps it from freezing, and by adding it to the sorbet, we manage to achieve a nice soft sorbet, as opposed to a bunch of flavored ice. I probably could’ve used a little less vodka (maybe a quarter cup), but it ended up working out just fine. Mine was a little on the soft side, but I find that this homemade stuff gets pretty hard in the freezer, so hopefully this can actually hold up. You can add a little more water to the recipe if this is a big concern. I garnished the dessert with the kumquats that had been sitting in the bottom of the vodka these past four weeks.tastes good

Kumquat Vodka Sorbet (serves six as a dessert, 12 if it’s used as a small intermezzo)

1½ cups water
about two fistfuls of kumquats (approx. quarter pound)
1/3 cup of kumquat infused vodka, chilled in freezer
1 cup of kumquat flavored simple syrup

Pour a half cup of water in a food processor with the kumquats. Process for about 30 seconds, or until the mixture is a liquid. Pour contents through a strainer into a bowl. Mix in the remaining water and the syrup in until blended. Churn this mixture in an ice cream maker until it’s a slush, and then add the chilled vodka. Continue churning until thick. Place the sorbet in a separate bowl and place in freezer if not solid enough.

If you don’t have kumquat infused vodka or kumquat-flavored simple syrup (and you probably don’t), just throw in a couple extra fistfuls of kumquats. This should easily serve as a supplement.


Strawberry Rhubarb Crisp

August 9, 2009

A Plea for Rhubarb

dun-dun-DUN!!!
Rhubarb gets a bad rep. Much like Crispin Glover or the new GI JOE movie, rhubarb is the victim of much undeserved derision and dislike. A lot of people claim to “not be fans of rhubarb,” but have never actually given it a chance. Perhaps it’s the name. The two syllables are not very appealing individually. The first bears a phonetic resemblance to the prefix “rheu,” which connotes some inflammatory disease. Barb is equally unlikable. Barb-wired fence, barbarian. Basically any barb is bad news bears in my book.

Then there’s the fact that it’s a root. Well, I think it’s a root. No, it’s got leaves, so it’s like a stem. It’s like celery in that way, I think. There’s another problem right there! It’s like celery! What is celery used for? It’s a crunchy filler or an anorexic staple. So people look at this thing and say, “Hey, it looks like a red piece of celery. And you make a dessert out of that?!? Gross!”

Let’s have a proper introduction, shall we? Rhubarb is the stalk of a plant, and when cooked, the rhubarb becomes a delightful, fruitlike thing. I sense that you are still a little hesitant. Well, let’s take it step by step. I made a strawberry rhubarb crisp. Pairing rhubarb with a universally loved fruit like strawberry oftentimes quells concerns.
finished product
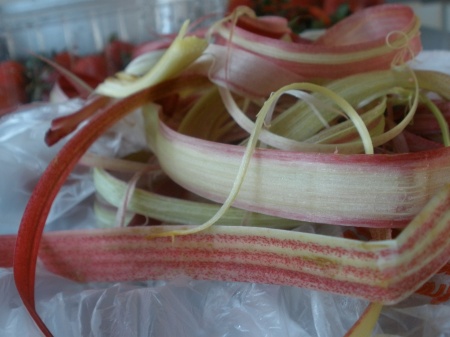
The first step is to prep the rhubarb. After washing them off, I cut off either end and peeled them with a paring knife. Guiding the knife down the stalk toward you, you can easily skin the rhubarb. Try not to take off too much of the rhubarb when skinning it. I hope I explained that properly. Hold the knife as if you were skinning an apple (which I used to do all the time, since I hated apple skin as a kid). Cut the stalks into half inch slices.
Skins
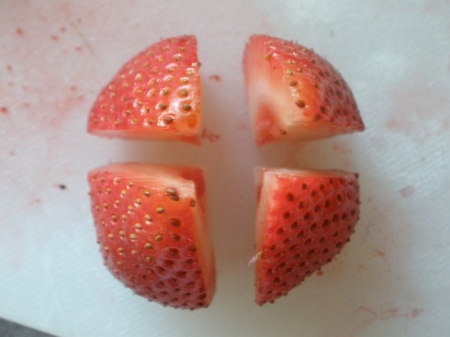
Then quarter the strawberries. If they are really small ones, feel free to just halve them. I ended up with a bunch of Hulk strawberries, though.

Drawn and Quartered

Combine the sugar and mix it around so that all the pieces of fruit get coated. This allows the sugar to absorb the liquid of the fruit. If the liquid doesn’t make it out, the crisp will bubble over when cooked, and we don’t want that. So give it some time.

The crisp topping recipe is massive. You probably could halve it and be fine. I ended up with a bunch of crisp left, but I know that I’ll end up using it on some unsuspecting fruit in the near future.

The recipe itself comfortably feeds 12 or so people (it begs for a nice side of vanilla ice-cream). Originally, the crisp was made individual ramekins. It works equally well in a big brownie pan.
Cue "Better Together"
Filling
3 or 4 stalks Rhubarb, peeled (I had the Barry Bonds of rhubarbs, so I just used 3, but I know they all aren’t the same size)
1 lb of strawberries, quartered
1/3 cup of granulated sugar

-Peel Rhubarb, then cut into small (½-inch) pieces
-Quarter strawberries, and add this to the rhubarb in large mixing bowl
-Add granulated sugar and mix in order to coat all pieces
-Let this sit for at least 2 or 3 hours, as the strawberries and rhubarb need to release their liquid. The sugar absorbs a lot of their juices. Collect this syrup in a container, leaving the fruit behind.
drained fruit

Crumb topping

¼ teaspoon of baking powder
3 cups of all purpose flour
1 lb of light brown sugar (I’ve made this with dark as well, so no worries if you don’t have light)
½ lb (two sticks) of butter (partially melted)

-With hands, mix the dry ingredients together in large bowl, getting all the brown sugar blended (remove any of those hardened balls)
-Microwave the butter for about thirty seconds until it’s half liquid and half solid
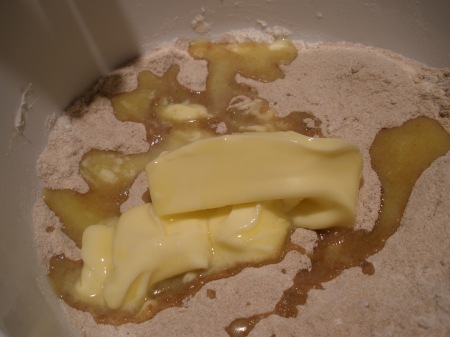
-Mix this butter in with dry ingredients, blending with hands until the texture is that of wet sand. Lightly rub mixture in between palms, creating small crumbs or balls
-DO NOT OVERWORK IT; some bits of unadulterated butter can be nice
Mixing in the butter
Putting it together
Preheat oven to 350

-Densely pack an ungreased pan with filling
-Cover filling with crumb topping
-Place in oven and bake for approx. 35 minutes, until the fruit bubbles (Note, I like my rhubarb a little crunchy, but most people want it totally soft). An easy way to test it is to use a fork to prick a piece.
-Give it at least fifteen minutes or so to set in place before eating.
A serving of the crisp
So hopefully you can find it in your heart to accept rhubarb into your repertoire. It’s a really tasty plant. So give it a try! As for Crispin Glover, well…


Frozen Watermelon Lime Bars

August 5, 2009

Delish

As a camp counselor, I get to essentially be a camper and get paid for it. Yes, I have to deal with scores of hyperactive and belligerent children, but on the whole it’s a pretty good way to burn up my summer days. The other day in the Art Shack (where building where “Arts and Crafts” takes place) we decided to have the kids make collages using a plethora of abandoned magazines. We had a couple of National Geographics, a few Peoples, several Home and Gardens, and even one Esquire (with a rather intense pictorial of Monica Belluci — not exactly kid-friendly). I sifted through the pile until I hit paydirt, Gourmet magazine. I started flipping through the pages until I reached a rather fantastic looking dessert called Frozen Watermelon Lime Bars.

Now, when I normally think of frozen watermelon dishes, I think of this…

Friendly's Wattamelon roll

While I’m sure it’s pretty tasty, it doesn’t exactly inspire. Gourmet’s recipe would doll it up a bit. Make a commercial dessert at home with a little flair? Count me in! And in all honesty, what else do you do with watermelon, other than cut it into cubes or slices for raw eating?

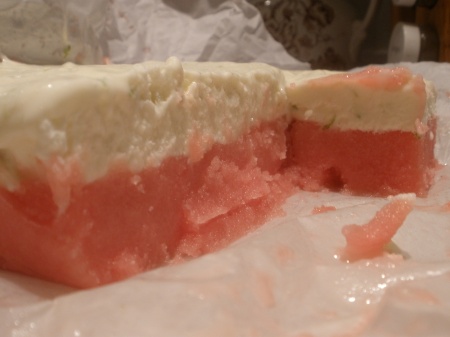
The recipe has two layers. The first consists of a watermelon sorbet; the second, a lime semifreddo. I know what you’re thinking: Semifreddo, what the flip is that? Wasn’t that the guy in The Godfather? Well, that was Fredo. But this is “Semifreddo,” Italian for “Half Cold.” The two flavors go well together, and the light green tint of the semifreddo layer (thanks to lime juice and zest, unlike the friendly’s counterpart) makes for a perfect contrast with the deep red of the watermelon sorbet.

First I made the sorbet, which was relatively straight forward. I’ve got an ice cream maker, so it wasn’t much of a concern, but ice cream and sorbet can be made just fine without one. In fact, I made a phenomenal cucumber lime sorbet a month or two ago in a food processor and the texture was fantastic, perhaps better than this one. But I’ll save that for another time…

This watermelon sorbet had a some tequila in it, which supposedly kept the sorbet from freezing fully. While this is definitely true, the tequila also provided a nice adultish oomph to the sorbet.

Ingredients… (courtesy of gourmet magazine)

For layer numero uno (Watermelon Sorbet)

2 1/2 lbs of watermelon
1/2 cup sugar
2 tablespoons fresh lime juice
1 tablespoon tequila

For layer numero dos (Lime Semifreddo)

1 (14-oz) can sweetened condensed milk
1 teaspoon grated lime zest
1/2 cup fresh lime juice
1/2 cup chilled heavy cream

Equipment:

an ice cream maker

Food processor
Electric Mixer

Make Watermelon Sorbet
Spread the wealth
Line a 9-inch square baking pan (2 inches deep) with plastic wrap or parchment paper, leaving a 2-inch overhang. Put lined pan in freezer.

NOTE: I used an 8 inch pan and it fit, but if you’ve got the “niner,” go for it.

Coarsely chop watermelon flesh (leave seeds in), then purée enough to yield 2.5 cups in a blender.

Then add sugar, juice, and tequila to purée and blend 30 seconds.

NOTE: When making a sorbet from melons, it is always better to err on the side of caution when food processing. Over blending can take away some of the taste, so my mixture still had a few little pieces of watermelon. Doing so had no negative impact on the dish.

Freeze sorbet in ice cream maker. Transfer to lined baking pan, smoothing top. Put in freezer to harden, at least 1 hour.

Smoothing the top
Making the Semifreddo

  • Whisk together condensed milk, zest, and juice in a large bowl. Beat cream in smaller bowl until it just holds stiff peaks, then gently fold the cream into condensed-milk mixture.
  • Spread over sorbet, smoothing top. Freeze until solid, at least 2 hours.
  • To serve, lift dessert from pan using plastic wrap. Cut bars and serve on chilled plates.

NOTE ON SERVING SIZES: The recipe says that you cut into 12 bars and that it serves 6, but you can really cut it however you want. I cut mine into squares like brownies and that served like 10 people.

I love our new microplane
NOTE ON KEEPING:  Assuming some of it makes it past the first serving, the bars can be frozen (covered once fully assembled) for a couple of days days. Let it sit for a couple of minutes before serving it. Maybe my refridge was just too strong, but it was practically an ice cube when I pulled it out today. I suppose I could always add a little more tequila…
Eat your heart out, Friendly's

Eat your heart out, Friendly's


CUCKOO FOR KUMQUATS

July 30, 2009
KUMQUATS

Move over Emma Watson! Kumquats are the new love of my life. How I’ve gone so long without them astounds me. For the uninitiated, kumquats are like grape-sized citrus fruits. It’s like if Rick Moranis shrunk oranges instead of the kids. Mother nature saw fit to inverse the flavors, making the rind sweet and the flesh sour. Not only are they tasty and conveniently sized, but they also have a pretty kickin’ name. Kumquat. Just say those two syllables—isn’t it fun?!?! Apparently the name originates from China, where “kam kwat” is Cantonese for “little orange.” My mom tells me she once made a salad using them, but apparently I wasn’t around for it. Lame.

The other day I was at the grocery store, when I saw them on the shelf for a whopping $5.79 a pound. Seeing as the cherries were on sale for 1.59, I almost hesitated. Almost. But how could I help myself! They are so cute and adorable! Holding the miniscule ‘quat in my hands made me feel so gargantuan, so empowered. I purchased about ¾ of a pound and biked home satisfied with my tasty treasure.

As I biked, I wondered what I should make with them. Something so delicious can certainly be eaten raw, but I felt that wouldn’t do them justice. So I set a handful (or two, or three) aside for casual popping, and the rest for cooking.

Candying processI decided on two separate things. First, I would candy some. A couple of weeks ago I made some orangettes. That was the first time I had candied anything, and those orange peels turned out phenomenally (then again, anything dipped in chocolate turns out phenomenally.) So I took maybe a quarter pound of my ‘quats and cut them up. Some I quartered, others I sliced crosswise. The smaller ones I left whole. The kumquats—unlike the orange peel—were not brined. The orange peels for the orangettes require brining because they are bitter. As previously mentioned, kumquat rind is sweet. So they went straight into the simple syrup (equal parts water and sugar—1.5 cups) and stayed there for about ten minutes or so.

P5280060I then plucked them out of the syrup and placed them on a cooling rack (with parchment paper underneath to collect the syrup); however, they refused to dry. Hour after hour, the kumquats remained sopping with the sticky goo. I assumed the disgustingly humid weather was sabotaging my candying! So I put them in the oven on a low temp (like 120ºF for an hour or so and left them in there for another couple of hours. I mean, that’s how I dry out my meringues. I then sealed them up in a tuperware, placed them in the fridge, and have been happily snacking on them ever since. I’m sure they’d be great in salads or in a savory dish. They’d also be great for decoration, like on top of a cake or ice cream. I kept the simple syrup, as it now smells and tastes like kumquat and took on a delightfully orange tint. Perhaps I’ll make a sorbet or something with it. Any ideas?

The second thing I decided to make was kumquat infused vodka. I’ve never enjoyed vodka, but I thought that this would be an interesting little experiment. I took a handful, cut them up, placed them in a jar, filled the jar with vodka, sealed the jar, placed it in the refridge, and waited. In fact, I’m still waiting. I have no idea when it will be done, but hopefully by this weekend. My dad’s birthday is Saturday, and this could make for some great vodka tonics or screwdrivers or something like that. I’ll keep you posted on how this turns out.

ABSOLUT KUMQUAT

Kumquats are pretty awesome; however, I wish they had more visibility. Most of my friends gave me looks of utter bewilderment when I told them I had purchased “kumquats.” Perhaps kumquats are in need of an anthropomorphic cartoon animal to spread the word. It worked for sugar cereals, why not kumquats?

In the meantime, here’s a poorly executed photoshop project…

KUMQUATS